

Why Your Chair Setup Is Costing You More Than Comfort

Many of us spend a large part of our workday sitting. We often choose positions that feel comfortable at the time, but these can lead to health problems down the road. This seemingly harmless "comfort" can significantly impact not just our physical health, but also our productivity and career longevity. So, what's the true cost of a poorly adjusted chair?
The consequences go beyond occasional aches and pains. Bad posture, often a direct result of an improperly adjusted chair, can lead to musculoskeletal disorders (MSDs). These disorders can include back pain, neck stiffness, and carpal tunnel syndrome. Simple adjustments, perhaps using an office chair adjustment guide, can make a big difference to your long-term health.
The Real Cost of MSDs
Adjusting your chair correctly can significantly reduce MSDs. These disorders account for 40% of serious workers' compensation claims in Australia. These claims result in a median time off work of 6.9 weeks and a median compensation cost of $13,350 per claim. Proper ergonomic setup, including chair adjustments, can prevent these issues and reduce claim likelihood by up to 40%. For more statistics, check out this Office Ergonomics Guide.
The Hidden Costs of Discomfort
An uncomfortable chair can also significantly impact productivity. Constant fidgeting and shifting can break your focus and concentration. This can lead to lower quality work and reduced output, affecting your overall performance. Chronic pain and discomfort can also contribute to stress and lower job satisfaction.
The Importance of Proper Chair Adjustments
The good news is that proper chair adjustments can mitigate many of these issues. Each part of your chair – the height, backrest, armrests, and seat depth – contributes to your overall posture and comfort. By understanding how to adjust these components, you can create a workspace that supports your well-being and boosts your productivity. Think of your chair as a personalized support system, tailored to your body and working style.
Unlocking Long-Term Benefits
Taking the time to master your office chair adjustments is an investment in your long-term health and career. By addressing discomfort proactively, you can avoid potential health problems and maintain optimal performance throughout your workday. The following sections of this office chair adjustment guide will detail how to adjust each part of your chair, helping you create a truly ergonomic and comfortable workspace.
Finding Your Perfect Chair Height (Without the Guesswork)
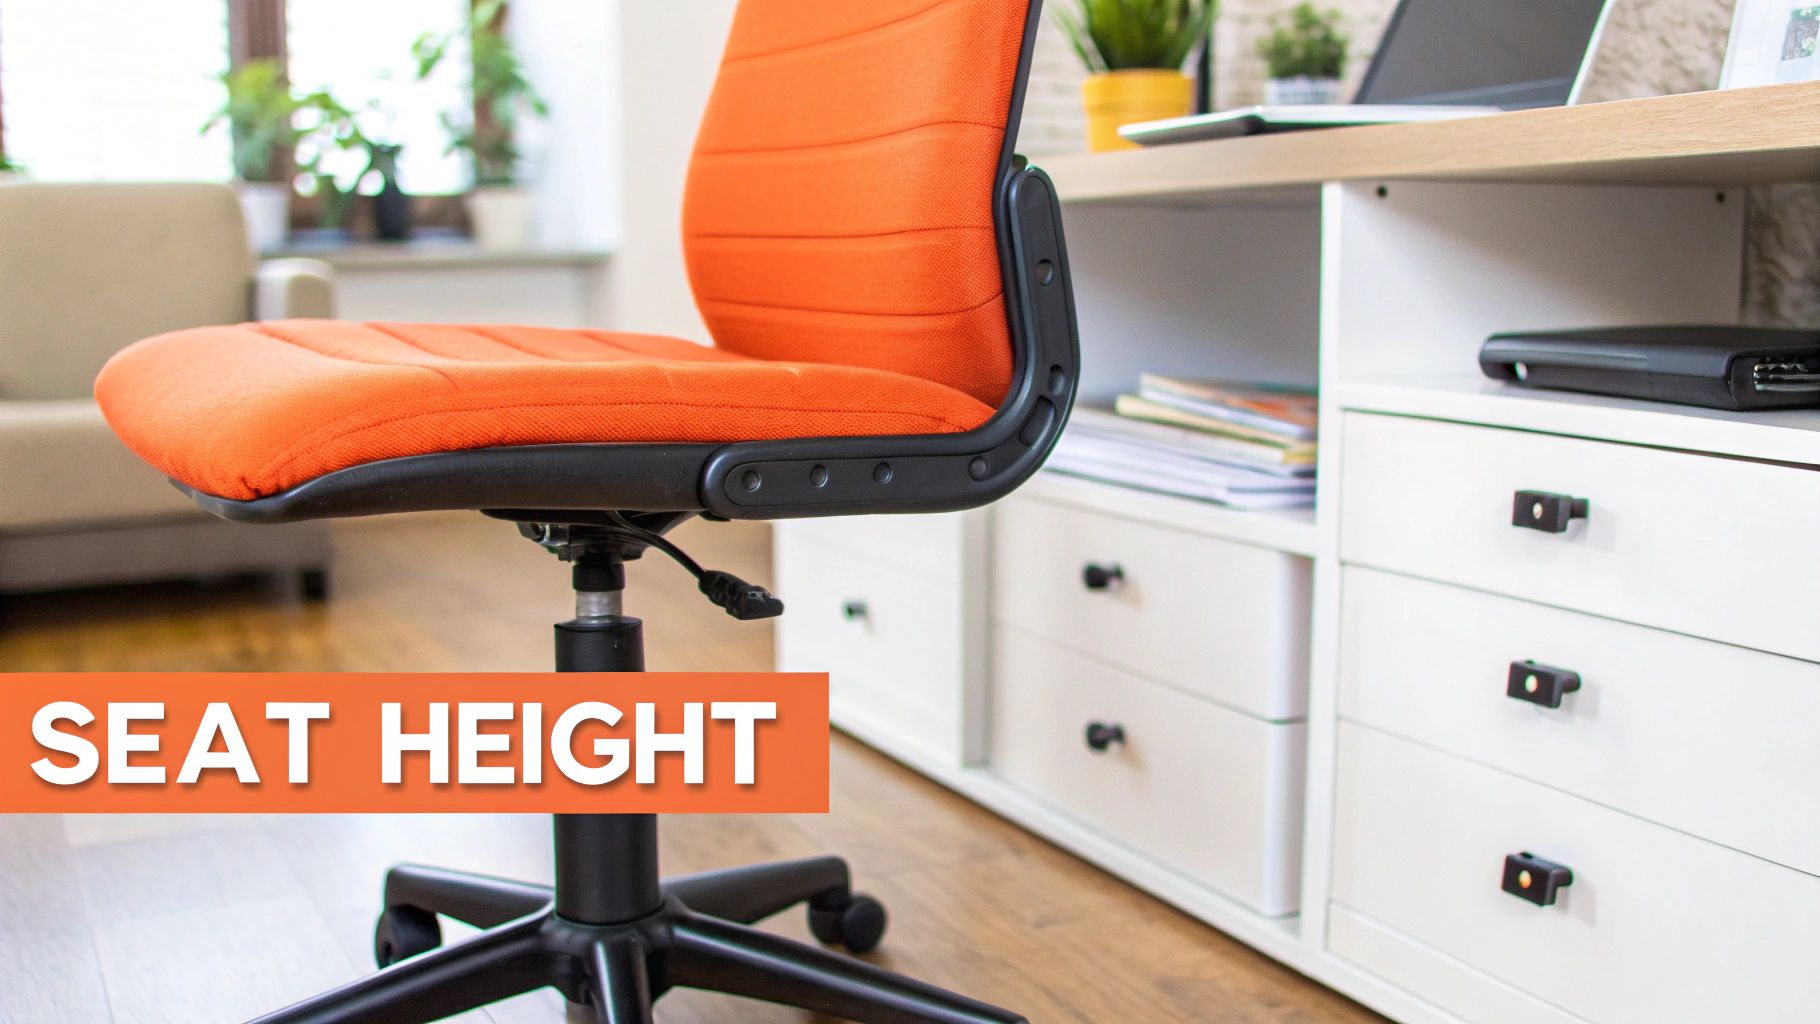
Finding the right chair height isn't about luck. It's about understanding your body and workspace. This guide provides a practical approach to finding the perfect chair height for optimal comfort and support, focusing on good circulation and proper spinal alignment.
The 90-Degree Myth
You’ve probably heard of the 90-degree knee angle rule. Feet flat, knees bent at a right angle. It’s a good starting point, but it’s not a one-size-fits-all solution. Individual leg length, desk height, and even your shoes can impact your ideal chair height. Focusing only on the 90-degree rule might not work for everyone.
When choosing an office chair, dimensions are key. Most chairs offer a seat height adjustment range of 16-22 inches (40-55 cm), allowing for that 90-degree angle with feet flat. Features like adjustable armrests and backrest tilt add extra comfort and support. Learn more about office chair dimensions.
Finding Your Ideal Height
So, how do you find your perfect chair height? Start by sitting with your feet flat on the floor. Adjust the chair until your thighs are parallel to the floor, or tilted slightly downwards. Your knees should be at or slightly below hip level. This promotes good blood flow and reduces pressure on your lower back.
Adapting to Different Desk Heights
If your desk is too high or low, you may need to adjust further. For a high desk, a footrest can help maintain correct leg positioning. If your desk is low, lower your chair and angle your keyboard slightly upwards for comfortable wrist positioning.
The following table provides some general guidelines for finding the ideal chair height based on your height. Remember, these are just starting points. It’s important to listen to your body and adjust accordingly.
Ideal Chair Height Settings by User HeightThis table shows recommended chair height settings based on user height ranges to help achieve proper ergonomic positioning.
| User Height Range | Recommended Chair Height | Optimal Knee Angle | Notes |
|---|---|---|---|
| 5'0" - 5'4" (152 - 163 cm) | 16" - 18" (41 - 46 cm) | 90° - 100° | May require a footrest for shorter users |
| 5'4" - 5'8" (163 - 173 cm) | 18" - 20" (46 - 51 cm) | 90° - 100° | Generally comfortable for most desk heights |
| 5'8" - 6'0" (173 - 183 cm) | 20" - 22" (51 - 56 cm) | 90° - 100° | May require a lower desk or keyboard tray for taller users |
| 6'0" - 6'4" (183 - 193 cm) | 22" - 24" (56 - 61cm) | 90° - 100° | Likely requires a higher desk and potentially a footrest |
As you can see, finding the right chair height involves a bit of experimentation. Use this table as a guide, and adjust based on your individual needs.
Listening to Your Body
Your body is your best guide. Pay attention to any discomfort. Numbness, tingling, or persistent aches mean your chair height needs adjusting. Even slight discomfort can be a sign. Regularly check your chair height, especially if you change tasks or footwear.
Backrest Secrets: Unlock Ergonomic Comfort

Your office chair's backrest is key for good posture and a healthy spine. This guide explores how to adjust your backrest for maximum support and comfort. We'll go beyond the basics to help you personalize your chair for your unique needs.
Understanding Backrest Angle and Lumbar Support
The angle of your backrest significantly impacts your lower back. A slightly reclined position, around 100-110 degrees, often works best. This angle reduces pressure on your lumbar discs. However, the ideal angle varies depending on your individual spine and comfort level. Listen to your body and adjust as needed.
Lumbar support, the curve in the backrest that cradles your lower back, is also essential. Too little lumbar support can lead to slouching and strain. Too much can also cause discomfort. Finding the right balance is key.
Testing Your Backrest Adjustment
A simple test can help you determine if your backrest is properly adjusted. Sit back against the chair and check for even contact along your spine. Avoid gaps between your back and the chair, especially in the lower back area. You should feel supported, not strained.
Dynamic vs. Fixed Backrests
Dynamic backrests, found on many modern chairs, allow for movement and flexibility. This can encourage better posture by engaging your core muscles. Fixed backrests provide stable support, but may limit movement. The best choice depends on your preferences and how you work.
Micro-Adjustments Throughout the Day
Our bodies change throughout the day. Sitting still for long periods can cause stiffness. Making small adjustments to your backrest throughout the day can make a big difference. Even slight changes can improve comfort and maintain good posture.
Addressing Existing Back Conditions
If you have a back condition, finding the right backrest adjustment is even more important. A physical therapist or ergonomist can provide personalized advice. They can help you determine the best angle and lumbar support for your specific needs. Even without a specialist, paying attention to your body can help you find a comfortable and supportive position.
Making the Most of Limited Adjustments
Not all chairs have extensive adjustment options. If your chair is basic, consider using a lumbar cushion or pillow. These can add extra support and customization. Maintaining good posture and taking regular breaks can also help compensate for limited adjustability. These tips can help you create a more comfortable and productive workspace.
Mastering Armrest Positioning For Upper Body Relief

Armrests might seem like a small detail, but their position greatly affects your upper body comfort. Incorrect placement can lead to neck and shoulder tension, impacting your well-being and productivity. This section of our office chair adjustment guide explains how to position your armrests for optimal upper body relief.
Why Standard Armrest Positions Often Fail
Many people use the default armrest height, assuming it's the correct position. This often causes more problems than it solves. Armrests that are too high force your shoulders upwards, creating tension and pain. If they're too low, you might slouch to rest your arms, straining your neck and back.
Proper arm support isn't only about height; it's also about the position relative to your body and desk. Correctly adjusted armrests allow your elbows to rest at a 90-degree angle while typing. This promotes a relaxed posture and minimizes strain on your wrists, shoulders, and neck.
The Ideal Armrest Position: A Step-by-Step Guide
Finding the right armrest position for you might take a few adjustments. Start by sitting upright with your feet flat on the floor, maintaining good posture. Then, follow these steps:
Adjust Armrest Height: Lower the armrests until your shoulders are relaxed and your elbows are bent at a 90-degree angle. Your forearms should rest gently on the armrests without lifting your shoulders.
Adjust Armrest Width: Position the armrests so they lightly support your elbows and forearms as you type. They shouldn't be so wide that they push your arms outwards, or so narrow that you hunch inwards.
Consider Desk Height: Make sure your armrests don't hit your desk when you're sitting correctly. If they do, you may need to lower your chair or raise your desk. If these adjustments aren't possible, consider removing the armrests.
Fine-Tune and Test: After making these adjustments, work at your desk for a while. Notice any discomfort in your neck, shoulders, or wrists. Make small adjustments to your armrests until you find a comfortable and supportive position.
Adapting for Different Working Styles
Your ideal armrest position can change depending on what you're doing. Proper arm support is key for tasks involving lots of typing. For other activities, you might find it more comfortable to lower or remove the armrests for greater freedom of movement.
Troubleshooting Common Pain Patterns
If you still have neck, shoulder, or wrist pain after adjusting your chair, it could be related to your armrest positioning. If pain continues, it's a good idea to see a healthcare professional. They can assess your specific situation and provide personalized advice. Even small adjustments to your armrests can significantly improve your long-term comfort and well-being. By following these steps and listening to your body, you can create a workspace that supports your health and productivity.
Beyond the Basics: Seat Depth and Tilt Techniques
After you've adjusted your chair height, backrest, and armrests, let's look at two more important adjustments: seat depth and tilt. These often-overlooked details can make a big difference in your comfort and posture.
Understanding Seat Depth
Proper seat depth gives your thighs support while keeping your back against the backrest. This helps distribute your weight evenly, prevents pressure points, and promotes good circulation. If your seat is too deep, you'll slouch to reach the backrest. If it's too shallow, your thighs won't have enough support.
To find the right seat depth, sit with your back against the backrest. There should be a space of about two to four fingers between the back of your knees and the front edge of the seat. This allows for good blood flow and prevents pressure on the back of your knees.
The Importance of Tilt
The tilt feature on your chair lets you lean back slightly, which takes pressure off your spine and engages your core muscles. This encourages movement and prevents stiffness from sitting for long periods. But just like other adjustments, balance is key.
Many chairs have dynamic tilt, which lets you recline at different angles. This encourages active sitting. Try various tilt angles and resistance levels to find what works best for you. Some chairs also have tilt tension adjustment, letting you control the resistance.
Seat Angle and Cognitive Function
The angle of your seat can subtly affect your focus. A slightly forward tilt encourages an active posture and can improve alertness. Leaning back a bit can be more relaxing and better for creative tasks. Experiment to see what seat angle best supports your thinking during different activities.
Matching Chair Settings to Different Tasks
You probably do different things throughout the workday – focused work, brainstorming, video calls, and so on. Adjusting your chair to fit these tasks can boost your comfort and productivity. For focused work, an upright posture might be best. For brainstorming, a slight recline could be ideal.
Before we discuss more tips, let's review a helpful checklist. This table summarizes how to adjust and test the key features of your chair.
Chair Adjustment Checklist
| Adjustment Feature | Optimal Setting | Common Mistakes | How to Test |
|---|---|---|---|
| Seat Depth | 2-4 finger-widths between back of knees and seat edge | Seat too deep or too shallow | Sit back against the backrest; check the gap behind your knees. |
| Tilt | Slightly reclined, with appropriate tension | Locked in an upright position, or tilted too far back | Lean back; ensure your back is supported and your core is engaged. |
| Seat Angle | Slightly forward for focus, slightly reclined for relaxation | Fixed angle, not adjusted to task | Adjust the angle; notice how it affects your posture and alertness. |
As the table shows, finding the right settings for your seat depth, tilt, and angle can significantly improve your comfort and support.
Reading Your Body’s Feedback
Pay attention to how your body feels. Numbness, tingling, or aches are signs your chair needs adjusting. Even minor discomfort can mean something isn't right. Check your seat depth and tilt regularly, especially if you switch tasks or feel uncomfortable.
Creating Movement Variation
Even with a perfectly adjusted chair, it’s important to change your posture and take breaks. Stand up, stretch, and walk around every 30 to 60 minutes to improve circulation and reduce stiffness. Combining movement with a well-adjusted chair is the key to long-term comfort. Remember, it’s not about finding one perfect position and staying there. It's about finding several comfortable positions that suit your needs throughout the day.
Building Your Complete Comfort Ecosystem
Your perfectly adjusted chair is a great start, but it's only one piece of the ergonomic puzzle. This section explores how your chair works together with other parts of your workspace, like your monitor and keyboard, to create a truly comfortable and healthy environment. We'll look at practical ways to assess and adjust your setup for maximum comfort and efficiency.
Workspace Harmony: Integrating Your Chair
Think of your workspace as a connected system. Your chair is the central hub, but its effectiveness depends on how well it interacts with everything around it. A perfectly adjusted chair won’t prevent neck strain if your monitor is positioned too low. And wrist pain can persist even with the best armrest settings if your keyboard is too far away.
Practical Workspace Assessment
Begin by taking a look at your current setup. Sit in your adjusted chair and pay attention to how your body interacts with your desk, monitor, keyboard, and mouse.
- Are your wrists straight when typing?
- Is your neck relaxed when looking at your monitor?
- Can you easily reach the things you use often?
These simple questions can highlight areas you can improve.
Synchronizing for Comfort and Efficiency
Once you’ve identified some potential problems, you can begin making changes. Try these simple adjustments:
- Raise your monitor so the top of the screen is at or slightly below eye level.
- Position your keyboard directly in front of you, close enough to avoid reaching.
- Place your mouse within easy reach, ensuring your wrist stays straight.
Combining these adjustments with your optimized chair settings will create a more comfortable and productive workspace.
Workspace Flows and Microbreaks
Even with a perfect setup, sitting for long periods can be harmful. Successful professionals build workspace flows into their day. This means changing positions and activities throughout the day.
- Stand up to take calls.
- Use a height-adjustable desk.
- Take regular microbreaks.
These short breaks, even just a minute or two every 30 minutes, can significantly reduce stiffness and fatigue.
Movement Integration Techniques
Find ways to incorporate movement into your workday. Microbreaks can include:
- Simple stretches at your desk
- Walking around the office
- Standing up and shifting your weight
These small movements help improve circulation, reduce muscle tension, and increase energy levels. Try shoulder rolls, neck stretches, or wrist extensions during your breaks.
Progressive Improvement Roadmap
Creating an ergonomic workspace is a journey, not a destination. Start with the most important adjustments, like chair height and backrest angle. Then, gradually refine other elements, such as monitor placement and keyboard position.
Keep track of your comfort level over time. Note any ongoing pain or discomfort. This helps you pinpoint areas that still need work and allows you to fine-tune your setup. Prioritize changes based on their effect on your comfort and well-being. Small, consistent changes can make a big difference over time.
Ready to see the difference a truly ergonomic chair can make? Explore the customizable options from Pago International, available at Officeworks. With over 20,000 customization possibilities, you’re sure to find the perfect fit.